I created these Chocolate Pots Of Gold for a demonstration I am doing on Studio 5 (a local talk show). They are so fun to make and would be such a great dessert to share with your family and friends on Saint Patrick’s Day.
The chocolate bowls can be made a few days ahead of time. You can also make the butterscotch mousse and the whipped cream a day ahead of time. Just cover and store it in the refrigerator until you are ready to use it. Make sure to use a gel food coloring in the butterscotch mousse.
The food coloring you buy at the grocery store will not work very well. You can find the gels at Walmart, Hobby Lobby, and some JoAnn’s in the cake decorating section. The only place I was able to find the Airhead Rainbow Berry Xtreme Sour Belts (boy, that is a mouthful) was at a gas station.
I don’t recommend using chocolate chips for the bowls. They take longer to set up and they are not as smooth as the almond bark is. Sometimes in the process of making the chocolate bowls, some of them will break. You might want to make a few extras in case this happens. I like to use water balloons because they smaller and thinner so they are easier to peel away from the chocolate.
*Update: I found that if you spray a little bit of cooking spray(not baking spray) in your hands and then rub it on the balloon before you dip it in the chocolate. Once the chocolate sets up, the balloon will come out of the chocolate bowl a lot easier.
*Some people are highly allergic to latex, make sure to wash and dry the balloons well before you dip them in chocolate and inform your guests that they were made with balloons.
I hope you have a great weekend and I will see you back here on Monday.
Until next time,
Carrie
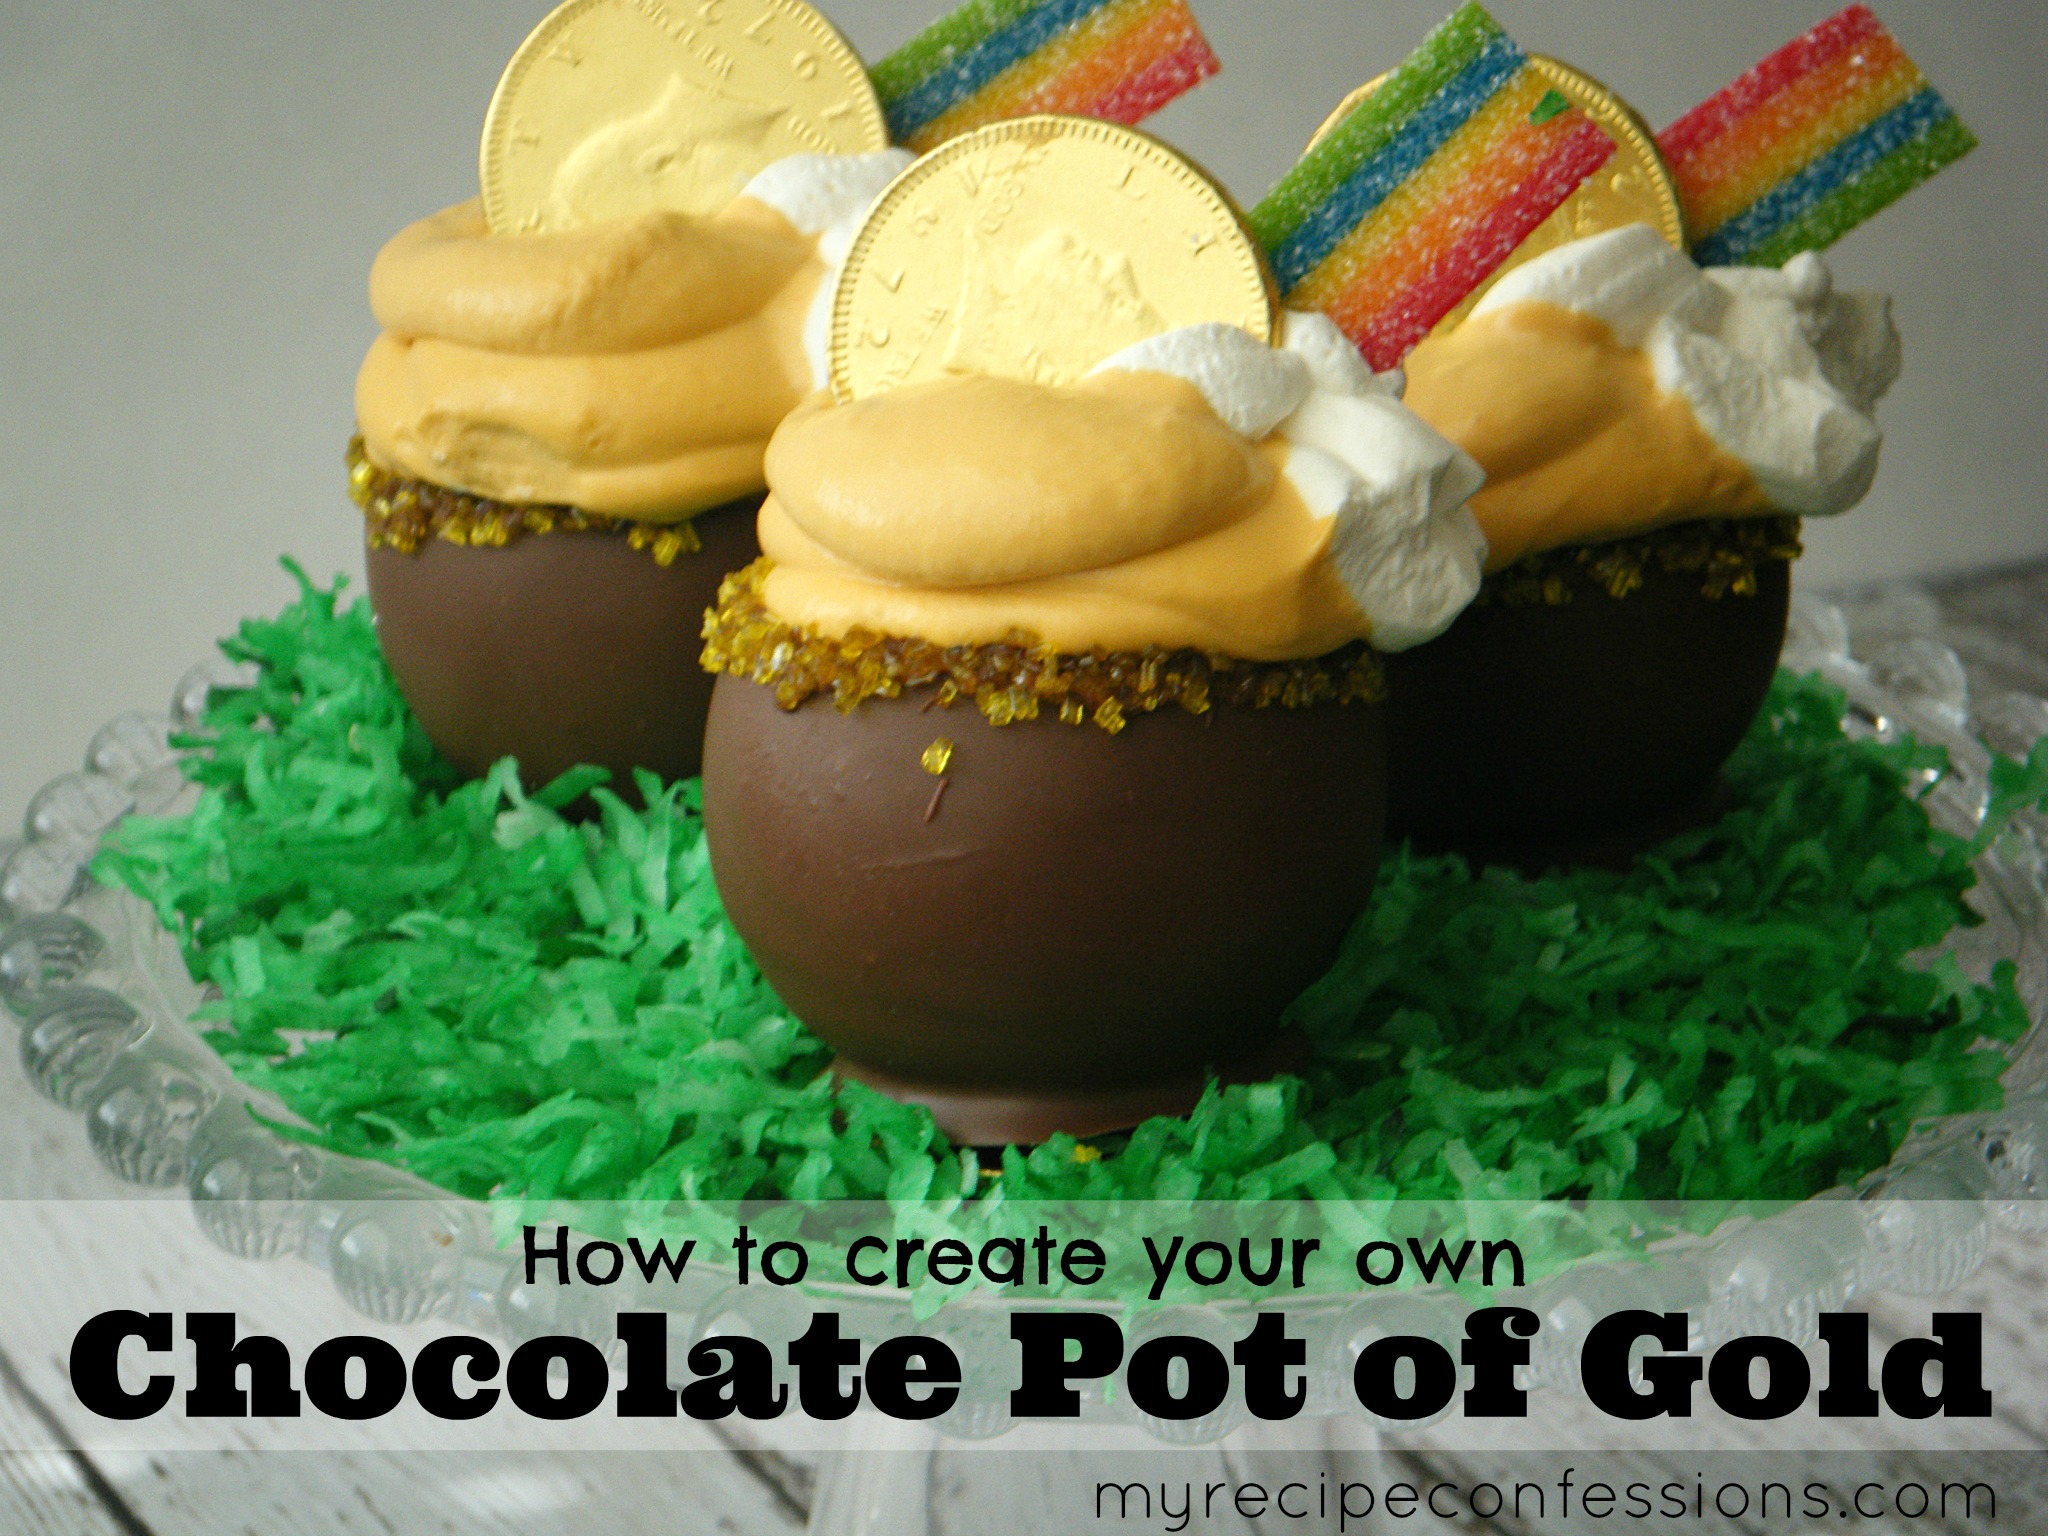
How to Create your Own Chocolate Pot Of Gold
makes 12 small chocolate pots of gold
12 chocolate bowls (recipe below)
5 to 6 cups of butterscotch mousse (recipe below)
1 package of Airheads Rainbow Berry Xtreme Sour belts, cut into 1 inch strips (you will only need 12 1 inch strips)
12 small foiled covered chocolate coins
1 1/2 cup of whipped cream (recipe below)
Assembly:
1. Spoon the butterscotch mousse in a large zip lock bag or a large pastry bag fitted with a #1G star tip. If you are using a zip lock bag, twist the top of the bag until it reaches the top of the mousse. On the corner that the mousse has accumulated cut 1/4 inch off the tip.
2. Pipe the mousse into the chocolate bowls in a circular motion until it is 1 inch above the top of the bowl.
3. Spoon the whipped cream into a pastry bag fitted with a #12 tip, or you can use the zip lock bag method from above. Pipe three small 1/2 inch circles right next to each other on the side of the mousse.
4. Place an rainbow Airhead strip into the center of the whipped cream. Place a foil covered chocolate coin into the whipped cream next to the rainbow Airhead. Refrigerate until ready to serve.
Chocolate bowls
12 water balloons, blown up to about 2 to 2 1/2 inches
7 squares of milk chocolate almond bark
yellow sprinkles
4 to 5 drops of yellow food coloring gel
wax paper
1. Place six almond bark squares into a round medium heat proof bowl with deep sides. Place in microwave for 20 seconds. Remove the bowl and stir the chocolate. Repeat this process until the chocolate is completely melted. Let the chocolate stand for 10 to 15minutes or until it cools to room tempature. *If the chocolate is too hot, it will pop the balloons.
2. Line a baking sheet with wax paper. Put a half a teaspoon of the melted chocolate on the wax paper and swirl it slightly to form a small circle (this will be the base that the chocolate bowl will sit on). Spray the cooking spray in your hands. Rub the cooking spray onto the balloon, making sure to evenly coat the balloon.
3. Holding onto the knot of the balloon, gently dip the two-thirds of the balloon in the melted chocolate. Slowly twist the balloon in the chocolate to make sure that all the sides are evenly coated. You may need to tilt the bowl slightly to coat the balloon better.
4. Place the chocolate coated balloon onto the chocolate circle on the wax paper. Repeat this process with the remaining balloons. Allow the balloons to set up for about 30 minutes or until the chocolate is hard.
5. Holding on to the knot, gently press on the top of the balloon to separate the balloon from chocolate. Be careful not to press to hard or you will crack the bowl. Place the balloons in the refrigerator for 5 to 10 minutes (this makes it easier to remove the balloon from the chocolate).
6. With scissors, poke a small hole at the top of the balloon. The balloon will start to shrink, carefully pull the balloon away from the bowl. If the bowl starts to crack, let it sit for a few minutes. The balloon will naturally pull away from the bowl as it shrinks, sometimes it helps to let it rest for a minute.
7. Place the remaining square of almond bark in a heat proof bowl in the microwave for 15 second intervals stirring in between until the chocolate is completely melted.
8. With a butter knife spread, a thin layer of chocolate along the edge of the bowl. Pour the yellow sprinkles onto a small plate. With the wet chocolate facing down dip the chocolate bowl into the sprinkles. Place the chocolate bowl back on the wax paper lined baking sheet. Let it sit for about 10 minutes so the chocolate can set up.
Butterscotch Mousse
1 package of butterscotch chips (high quality)
3 cups of heavy whipping cream
4 to 5 drops of yellow food coloring gel
Instructions:
1. Place the butterscotch chips into a medium sized heat proof bowl. In a small sauce pan, warm up 1 cup of heavy cream. Remove the cream from the stovetop just before it starts to simmer.
2. Pour the hot cream over butterscotch chips. Let it sit for 5 minutes. Gently whisk the cream and butterscotch chips until it is thick and smooth.
3. Cover the butterscotch cream with plastic wrap and place it in the refrigerator until it is chilled.
4. Remove the chilled butterscotch cream from refrigerator and add the remaining 2 cups of heavy cream and yellow food coloring. With an electric mixer whip the mixture until it forms stiff peaks. Chill in the refrigerator until ready to serve.
Whipped Cream
1 1/2 cup of heavy whipping cream
2 tbsp. granulated sugar
1 tsp. vanilla extract
1. Place all three ingredients in a medium sized bowl. With a electric mixer, whip the cream until it forms stiff peaks. Chill until ready to use

Those pots of gold look amazing! Congrats on doing a studio 5 segment, so cool!
Thanks Amy! How are you doing?
These look amazing – great job!
Thank you so much!